Post by kalkamel on Oct 19, 2006 22:23:15 GMT 8
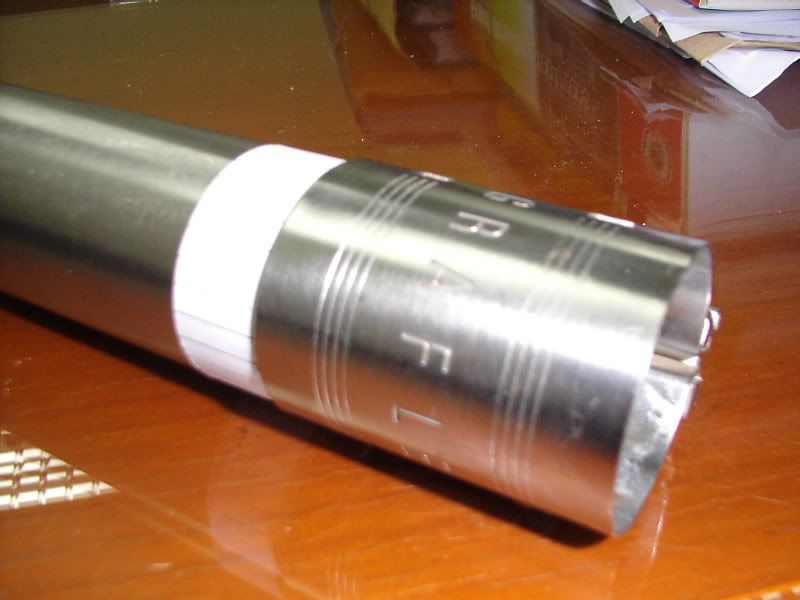
Check out what just arrived for me in the mail:
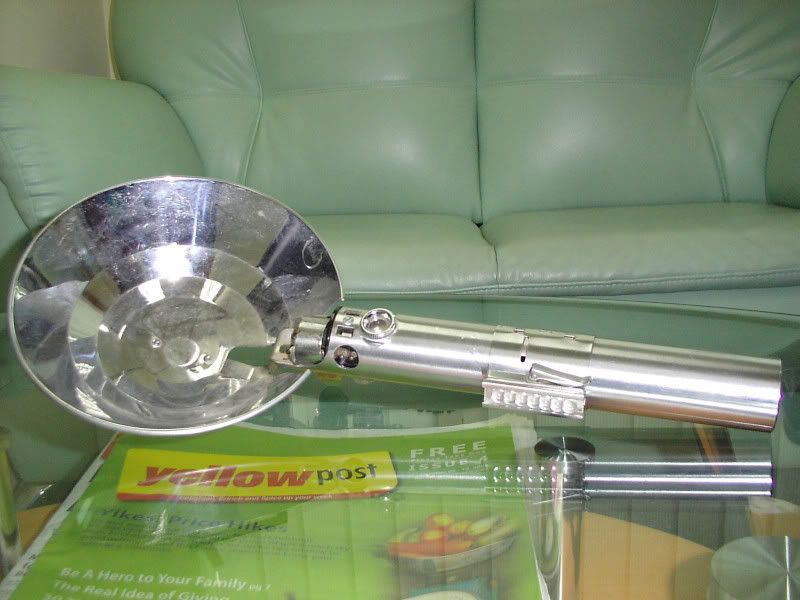
That is an honest-to-God vintage Graflex 3-cell flash handle with a 7" reflector. Its not exactly in mint condition, but has reasonable wear and tear.
I thought it'd be interesting to share with you guys the steps required to convert a Graflex 3-cell into Luke Skywalker's lightsaber in Star Wars: A New Hope.

"Its's your father's lightsaber... this is a weapon of a Jedi Knight... a more elegant weapon for a more civilized time."
The "ingredients" you need are basically a Graflex 3-cell tube and an ANH Conversion kit.
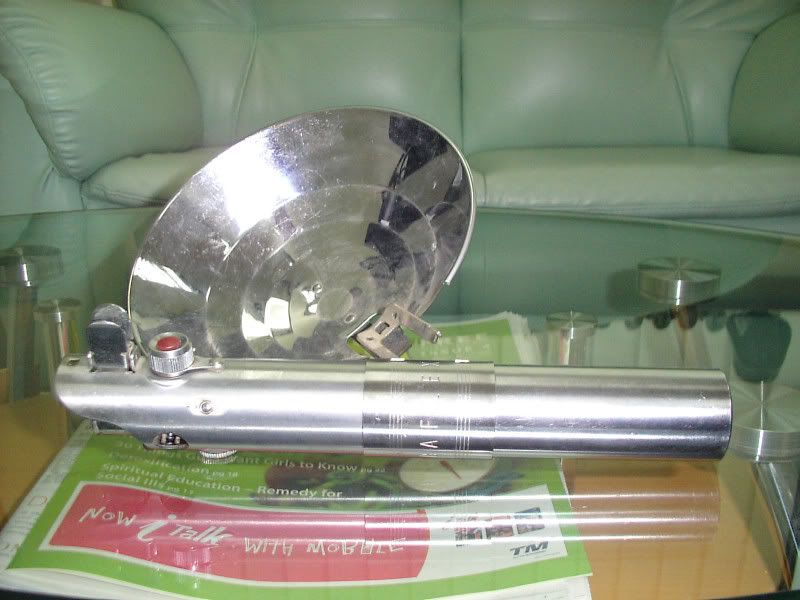
First, let's prep the Graflex. As you can see, the reflector is still attached.

To remove it, push the relector downwards until it unlocks from the tube and then push it forward to release it. It's that simple (thanks, Pol!).
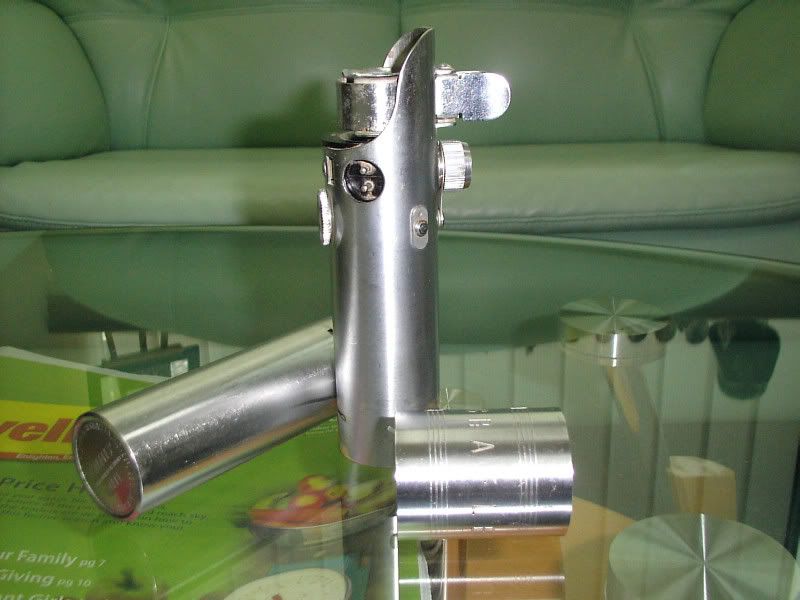
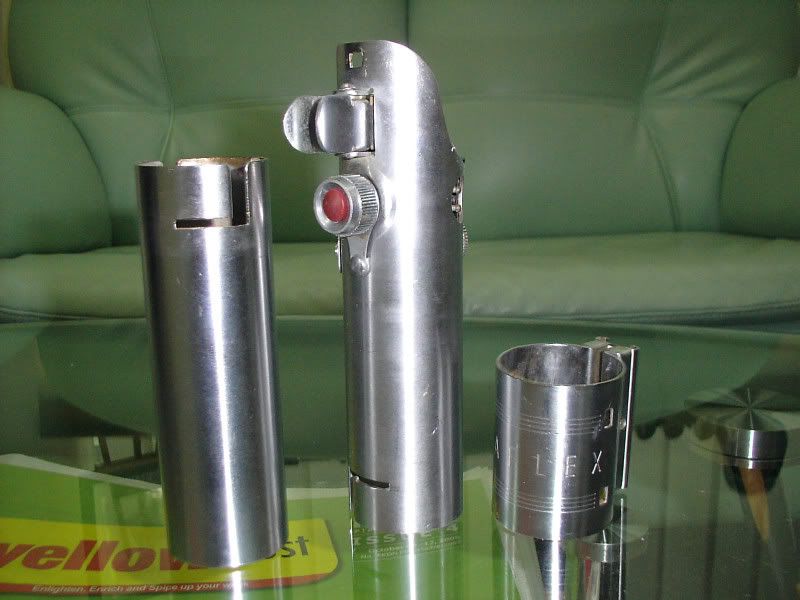
Now we need to clean the handle. In order to do that we would need to disassemble the tube. Unscrew the clamp lever, remove the top and bottom tubes and you're set.
Clean the three parts with some acetone applied with a rag. Best way to get acetone is to use a nail polish remover like Cutex. After that, use some metal polish to enhance the nickel sheen of the tube.
OK, here's where the Blast-tech conversion kit comes in. You can purchase it from this site: www.blast-tech.com/products_packagedKits_GX-1.asp
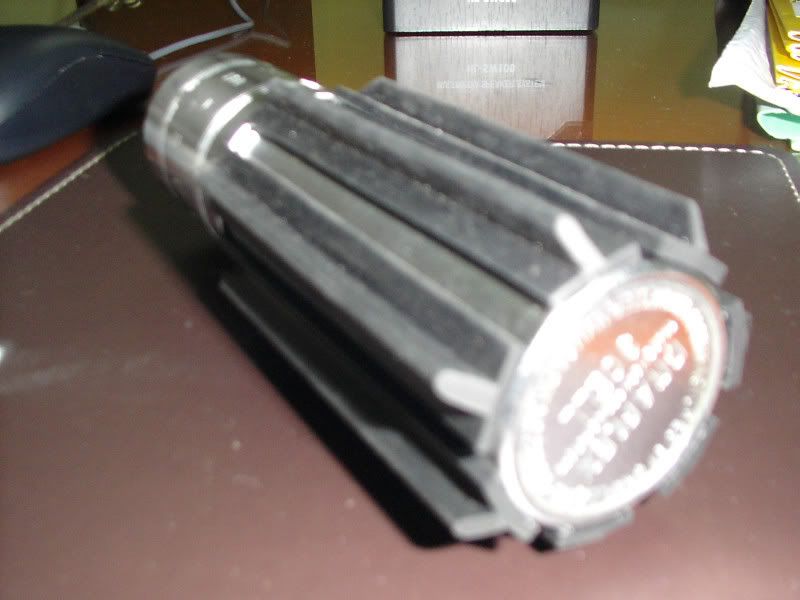
Here's what it looks like:

It consists of seven T-track rubber grips with adhesive backing, a replica Exactra 19 bubble strip, a D-ring holder and screw/washer and mylar chrome tape.
Now you're ready for the conversion process. First thing you need to do is go to www.partsofsw.com and get the 7-grip template. Then cut out an inch width strip from the template and attach it to the lower tube just below the clamp.
Mark the solid lines from the strip onto the tube with a pencil.
![]()
img.photobucket.com/albums/v326/kalkamel/Graflex012.jpg[/IMG]
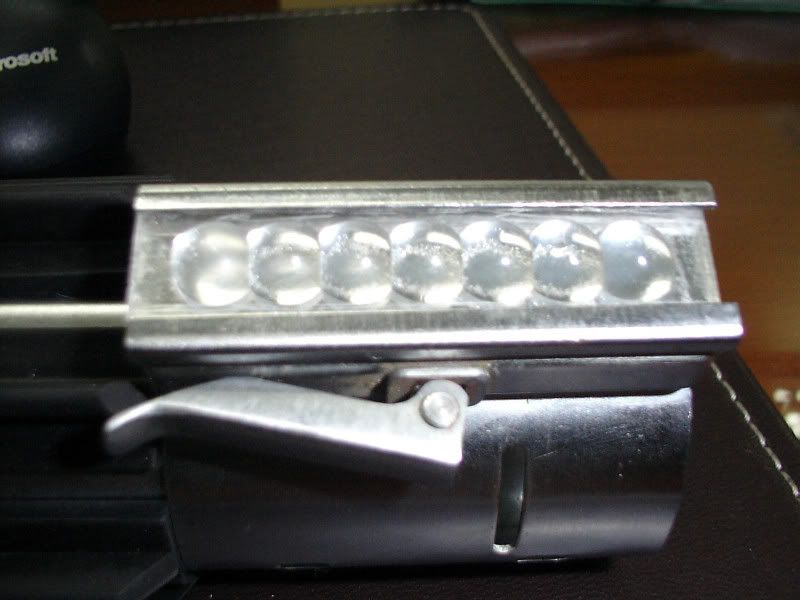
With the pencil marks as a guide, stick the rubber t-tracks onto the bottom tube.
Now we need to attach the D-ring holder. Lay the D-ring holder on the base of the bottom tube so that the edge of the semi-circular piece that attaches to the flash barely touches the edge of the butt, and such that this pieces points in the OPPOSITE direction from the clamp protrusion.
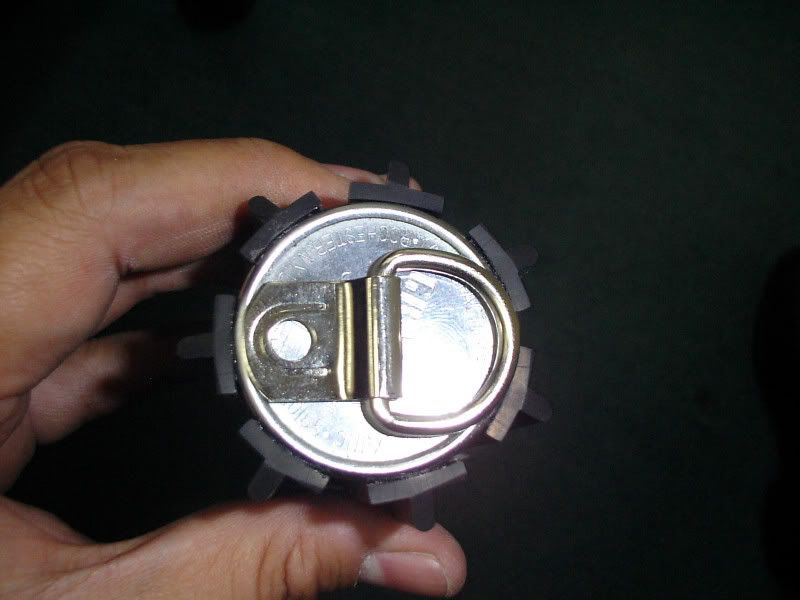
Mark the circle with your pencil so that you'll know where the screw will go.
Here comes the hardest part... definitely not for the fainthearted. Pick up a drill... I said pick it up, wussy! Now with the pencil mark circled earlier, drill a hole in the bottom tube base, large enough for the screw to go in. Now, place the D-ring holder over the hole and attach the screw with an allen wrench.

Whew! I'm glad that's over!
Next, slide in the Blast-tech bubble strip with a strip of chrome tape underneath it into the clamp. An optional step would be to cover the "GRAFLEX" on the clamp with the other mylar strip in the kit.
You're almost done! Now, re-attach the upper tube. If you're going for the screen accurate version, line up the upper tube so that the clamp is at 3:00/2:30 (looking into the emitter, ears up). If you're going for the promo look, line it up so that the clamp is at 3:00/2:30 9:00. Tighten the clamp lever. And that's it! You've taken your first step into a larger world!
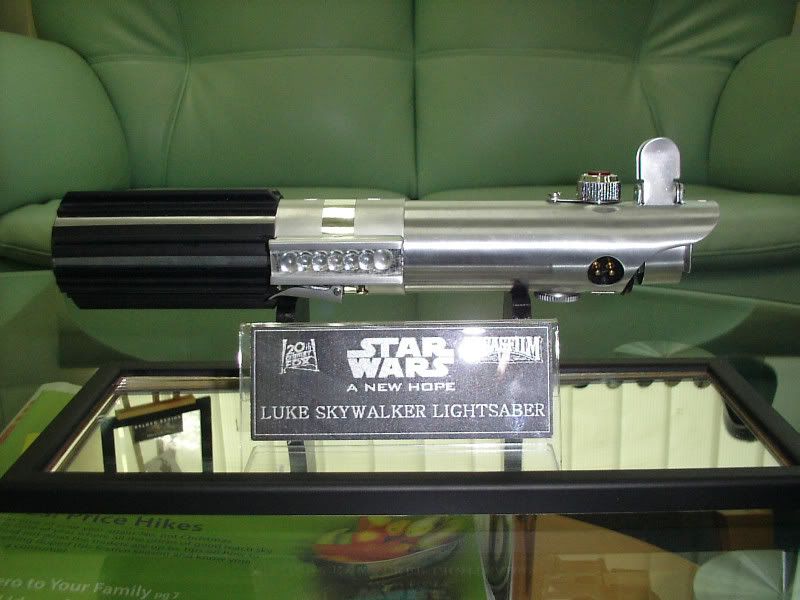
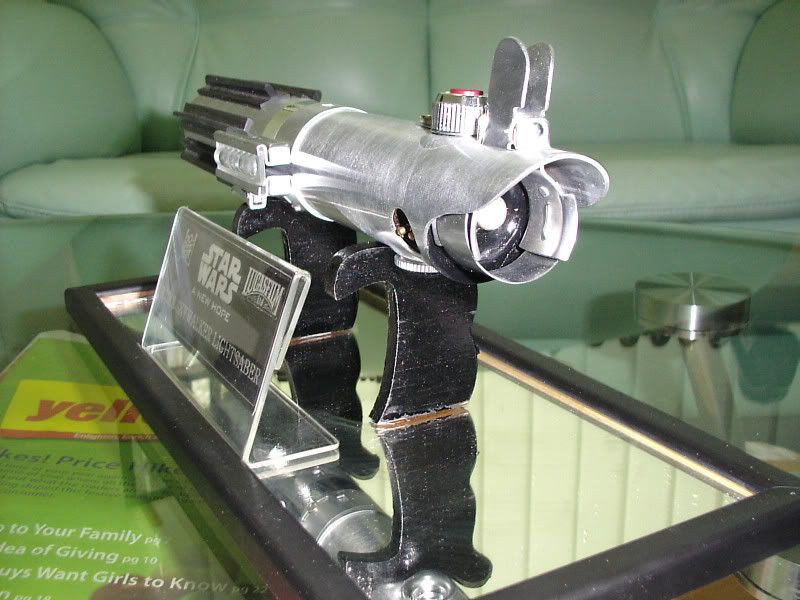
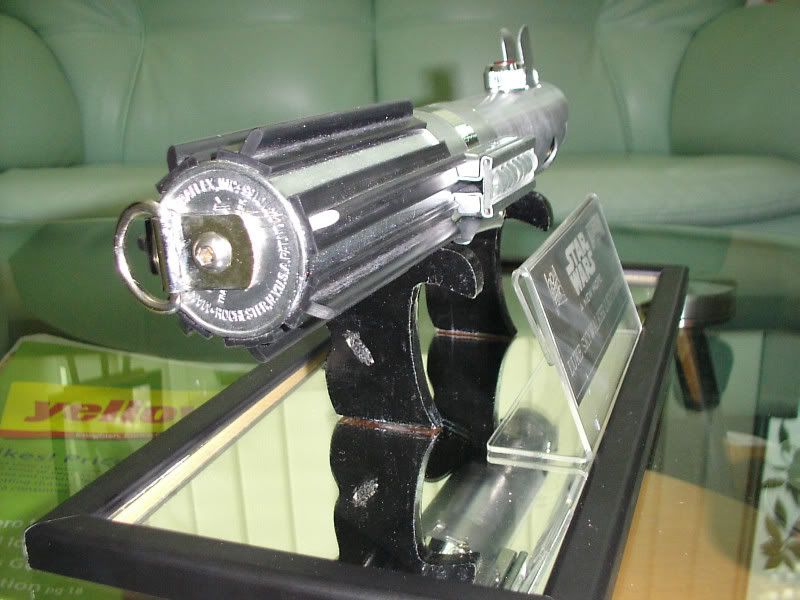
Here's some pics of the finished product. I decided to go with the promo version for mine:
Hope you enjoyed this tutorial!
That is an honest-to-God vintage Graflex 3-cell flash handle with a 7" reflector. Its not exactly in mint condition, but has reasonable wear and tear.
I thought it'd be interesting to share with you guys the steps required to convert a Graflex 3-cell into Luke Skywalker's lightsaber in Star Wars: A New Hope.
"Its's your father's lightsaber... this is a weapon of a Jedi Knight... a more elegant weapon for a more civilized time."
The "ingredients" you need are basically a Graflex 3-cell tube and an ANH Conversion kit.
First, let's prep the Graflex. As you can see, the reflector is still attached.
To remove it, push the relector downwards until it unlocks from the tube and then push it forward to release it. It's that simple (thanks, Pol!).
Now we need to clean the handle. In order to do that we would need to disassemble the tube. Unscrew the clamp lever, remove the top and bottom tubes and you're set.
Clean the three parts with some acetone applied with a rag. Best way to get acetone is to use a nail polish remover like Cutex. After that, use some metal polish to enhance the nickel sheen of the tube.
OK, here's where the Blast-tech conversion kit comes in. You can purchase it from this site: www.blast-tech.com/products_packagedKits_GX-1.asp
Here's what it looks like:
It consists of seven T-track rubber grips with adhesive backing, a replica Exactra 19 bubble strip, a D-ring holder and screw/washer and mylar chrome tape.
Now you're ready for the conversion process. First thing you need to do is go to www.partsofsw.com and get the 7-grip template. Then cut out an inch width strip from the template and attach it to the lower tube just below the clamp.
Mark the solid lines from the strip onto the tube with a pencil.
img.photobucket.com/albums/v326/kalkamel/Graflex012.jpg[/IMG]
With the pencil marks as a guide, stick the rubber t-tracks onto the bottom tube.
Now we need to attach the D-ring holder. Lay the D-ring holder on the base of the bottom tube so that the edge of the semi-circular piece that attaches to the flash barely touches the edge of the butt, and such that this pieces points in the OPPOSITE direction from the clamp protrusion.
Mark the circle with your pencil so that you'll know where the screw will go.
Here comes the hardest part... definitely not for the fainthearted. Pick up a drill... I said pick it up, wussy! Now with the pencil mark circled earlier, drill a hole in the bottom tube base, large enough for the screw to go in. Now, place the D-ring holder over the hole and attach the screw with an allen wrench.
Whew! I'm glad that's over!
Next, slide in the Blast-tech bubble strip with a strip of chrome tape underneath it into the clamp. An optional step would be to cover the "GRAFLEX" on the clamp with the other mylar strip in the kit.
You're almost done! Now, re-attach the upper tube. If you're going for the screen accurate version, line up the upper tube so that the clamp is at 3:00/2:30 (looking into the emitter, ears up). If you're going for the promo look, line it up so that the clamp is at 3:00/2:30 9:00. Tighten the clamp lever. And that's it! You've taken your first step into a larger world!
Here's some pics of the finished product. I decided to go with the promo version for mine:
Hope you enjoyed this tutorial!