Jedi Outer Tunic Tutorial 
To make the basic Jedi Outer Tunic pictured below :

You will need the following:
Simplicity Pattern #8311- you will be making View B – the men’s top
Fabric:
It is best to use a natural fiber fabric. You can choose from wool, wool crepe, linen, cotton, raw silk, or any blends of these fabrics. The fabric used for the tunic in the photo was “
Osnaberg”. Osnaberg is
100% cotton and is relatively inexpensive and readily available. The amount of fabric that you will need will, of course, be determined by the size of the final tunic.
IMPORTANT : be sure to purchase at least 3 yards of additional fabric if you intend to make your sash and tabards out of the same fabric. Purchase at least an additional yard or two of fabric due to some of the alterations made to the basic pattern.
Color of the fabric is strictly up to you: choose from browns, creams, beige and tans for the best canon Jedi colors.
After doing this tutorial….I found out that this pattern is no longer available.

This is a real shame, it was my favorite pattern.

You can find discontinued patterns on E-bay. Other patterns that I have used or bought are:
Simplicity #0606 (I don’t like the dropped sleeve) and
McCall’s #2433 (Space Nomads) also no longer in print. Also, some people have used patterns for a
karate gee.
Begin by washing, drying and ironing your fabric! This is a very important step as some fabrics can shrink a great deal. You don’t want to find that out after you have already made your tunic! And yes, wool and silk can be washed. Just wash wool and silk with a gentle detergent and DO NOT put through a hot dryer, just air dry them. Ironing the fabric just makes it easier to lay out the pattern pieces.
From here on in, I will be going back and forth using the instructions that come with the pattern and my own instructions for modifying the basic pattern.
You will be mainly using pattern pieces #1,2, & 3. Piece #5 is for the neckband, but I chose not to use that piece. I made a pattern piece out of blank paper to use instead (details on the neckband to follow). In my opinion, the pattern piece #5 is too hard to work with and makes the collar stand up a little too much. Note that if you are a first time sewer, you can surely go ahead and use pattern piece #5. The result is pretty good and it will be easier for you to follow the assembly directions that come with the pattern.
Read all the instructions that come with the pattern! This will make you aware of the layout of the pattern pieces onto the fabric and also things like grain, nap, right side and wrong side of fabric. Take a close look at pattern pieces #1 and #2, note the cut-line for view “B”. In my opinion, this cut line is a little short. I do not cut the pattern at the cut line for these two pieces. I would take a measurement from the top of the shoulder to approximately where you want the hem to fall on the person who will be wearing the costume. Compare that length to the pattern cut line. Note that you might have to cut additional length in the fabric. Leaving the part of the pattern below the cut line allows you to do this and you will have to alter placement of the pattern pieces on the fabric to allow for the extra length you may need. Note also that the pattern piece for the sleeves seems to be really short also. Take another measurement from the top of the arm where the shoulder seam will fall-down to where you want the sleeves to end. I personally like the sleeves a little long, so I hem them at my knuckles instead of the wrist. Compare that measurement to the pattern and you will find that you will have to probably cut longer sleeves (remember to leave seam allowance!) and will have to adjust pattern placement on the fabric to allow for that extra sleeve length.
A
GOOD HINT: If this is your first attempt at sewing, and you have purchased an expensive fabric, you may want to hit the bargain bin at your local Wal Mart. Buy some $1.00 a yard fabric and do a first run with that. It will be a good learning experience and will save you mistakes and money with your good fabric.
For the custom neckband (replacement for piece #5) this is the procedure that I used. Take pattern piece #1 and place it on a large sheet of plain paper. You can purchase blank pattern paper from a sewing store, but I just used blank paper that I save out of packages that get sent to my house. Trace the outline of the curved front of pattern piece #1 onto the blank paper from the top seam all the way down the front to the length of the tunic as you have determined. Taking a ruler mark back 6” from the line, making a mark every few inches will help you get the curved piece pretty accurate. Cut out that 6” strip that follows the curve of the front of the tunic. Next take pattern piece #2 and do the same along the neckline. Note that pattern piece #2 is laid out on the fold. Trace the neckline on pattern piece #2 and make a 6” strip same as the tunic front. Remember when laying out this pattern piece that you must lay piece #2 out on a fold too. The result will be a neckband that follows the contours of the actual neckband of the tunic, and you would use the custom made pieces to replace the #5 neckband pattern piece. Remember, if these instructions don’t make any sense to you, it is ok to use pattern piece #5.
From this point on, just follow the assembly instructions that come with the pattern.
As far as the overall hemming, that can be as varied as the Jedi themselves. If you look at photos of all the Jedi Knights, they seem to have developed their own sense of Jedi Style. Generally, I have found that the younger Knights and Padawans seem to wear shorter tunics. If you note
Anakin Skywalker,
Obi-Wan,
Kit Fisto,
Adi Galia, and
Bultar Swan are some of the many Knights that wear their tunic rather short, around mid thigh.
Qui-Gon’s tunic was slightly longer than
Obi-Wan’s.
Mace Windu wore his tunic all the way to the knee. Floor length tunics were worn by
Yoda,
Saesee Tiin,
Yarael Poof, and
Obi-Wan when he was known as “
Ben Kenobi” in Episode IV. Then there is the totally different Jedi garb of
Luminara,
Barriss,
Shaak Ti, and
Aayla. I imagine that
Barriss took her style from her Master and
Aayla was just wearing garb close to her native planet.
It would almost appear that the less fighting you were doing, the longer your tunic was…and that does make sense!
Make sure to pick up the separate tutorial for the Tabard and Sash if you have no definite pattern for these pieces of a Jedi’s garb.
A last few thoughts……….- Some fabrics fray terribly, so if you have access to a serger it would be wise to serge your fabric pattern pieces. If you don’t have access to a serger, you can also use pinking shears.
- A sewing machine is nice, but not necessary! My first Jedi costume (which was the first thing that I ever sewed) was done completely by hand. Yes, it was time consuming, never ending, and not completely professional looking, but it can be done. After I made a couple tunics, I finally gave in and purchased an inexpensive used machine. You can find good ones used. You don’t need a lot of bells and whistles…just a good basic machine.
- Purchase a good pair of scissors…period! Never cut paper or anything but fabric with said scissors!
- Purchase straight pins….lots of them….and use them!
- Iron seams…it just makes things a lot easier.
...and to
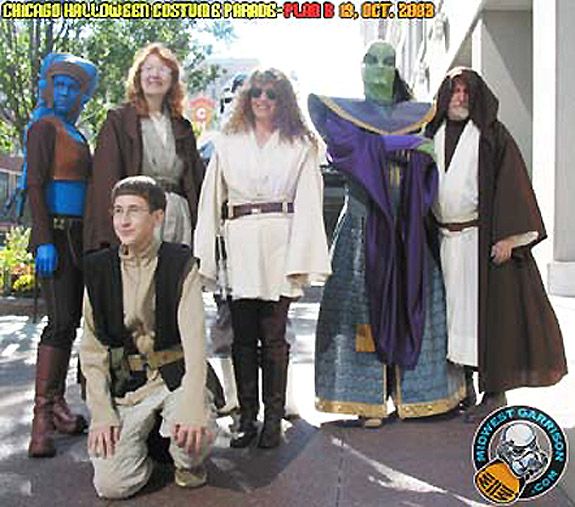
SUM up this section of the Tutorial here is Jedi Master
Schph Gochi in full Jedi attire (minus the Outer Jedi Cloak) and her costumed friends during the
CHICAGO HALLOWEEN COSTUME PARADE October 19, 2003
From
L to
R : Aayla Secura, Jedi Knight,
Schph Gochi, Prince Xizor, Old Ben Kenobi and Jedi Padawan (with Moe's hair style

) kneeling in front.